Ain’t no sunshine…

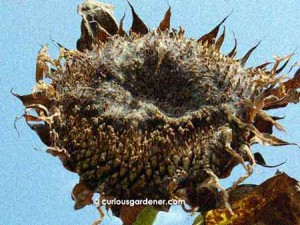
The harvested Early Russian flower head.

It was always a possibility, but then I’m an optimist. To my great disappointment, it appears that my Early Russian sunflower didn’t set seeds after all. Looking at the flower after it bloomed, it looked like there were lots and lots of seeds ripening up there. However, when I finally harvested the flower head, it felt unnaturally light in weight. I wasn’t worried initially because there were a number of plump-looking seeds along the outer edges. However, they turned out to be thin-shelled and hollow. Maybe the flower was too high to attract pollinators after all. There goes my next dream of filling the garden with lots of Early Russian sunflowers. :(

© 2011 curiousgardener.com All rights reserved.


Share

Caixin – cut and grow again!

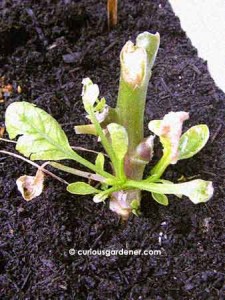
New growth sprouting from the pruned caixin plant.

When I started growing caixin, I thought it would grow into the nice tight bunch of leaves that we normally see sold – and that we would have a one-time harvest. It’s so nice to see otherwise!

First of all, I was surprised to see that the plant actually branches out, once the main stem is established. I guess the logical thing is that as the plant matures and produces bigger leaves, it needs to have stronger stems to support those bigger leaves – so it grows those. As the plant also grows taller, the lower part of the stem discards the older leaves and is left bare. That’s where the new stems start growing, hence the branching out!

Another way to get the plant to start growing new stems is to do some harvesting or pruning. No thanks to the recent infestation of little green caterpillars, I’ve pruned away a lot of the nasty parts of the plants – not just leaves, but whole branches, too. The caterpillars tend to spin little web-like threads that are concentrated at joints, and these sticky strands tend to catch and hold on to the caterpillar droppings – an ugly, unhealthy looking appearance. I got rid of them all, leaving sad-looking caixin plants in the planter.

More leaf growth!

A week later, I had the happy surprise of seeing new leaves sprouting in several places. I was so pleased, because I didn’t expect that of this veggie. All the new growth gave me hope of maybe – just possibly – being able to eventually harvest some caixin if I can keep the pests away. And, if it keeps growing new stems and branches, we’ll be able to harvest caixin for a longer period than expected. Did you know it was cut and grow again? 8)

© 2011 curiousgardener.com All rights reserved.


Share

Waiting to harvest Early Russian sunflower seeds

Almost all dried up - leaves, petals, bracts...

It’s been 4 weeks since my Early Russian sunflower finished blooming. By this, I mean that all the little disc flowers had bloomed, giving the centre of the sunflower that pincushion look, and the ray flowers, or outer ring of petals, had started drying up. Remember, it’s a composite flower. Since then, I’ve been watching the plant like a hawk, because I want to harvest the seeds to plant more of this gorgeous sunflower – especially since my purchased seeds seem to have lost their viability. :(

By all appearances, the flower now looks ready for the seed harvest – even the green bracts that cup the flower base have dried up. Some people advise removing the flower head at this point, together with about 30cm of the stem, and to hang it upside down somewhere airy to dry for a few more weeks; others advise waiting until the entire back of the head dries all the way to the stem. I’ve done the latter before. However, with the rainy weather (sporadic as it is) that we’ve been having, I’m considering taking it now in case it gets moldy – always a possibility in our humid climate.

There's a lot of what looks like spider webs covering the surface of the drying flower head. I don't really want to know what's beneath...

Besides that, it looks like spiders or something have taken up residence in the drying flower head – there seems to be a layer of web covering a lot of the surface of the centre of the flower. That’s the one thing I don’t enjoy about harvesting sunflower seeds – there’s an Eek factor because you don’t know what’s started living in the dried flower heads. This is the first giant sunflower I’ll be harvesting, and I just know there’ll be many more insects in there than I’ve encountered before… e_e

Should I wait or should I cut it now? Hmm…

© 2011 curiousgardener.com All rights reserved.


Share

How to germinate Rudbeckia hirta seeds

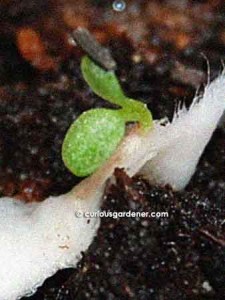
A 2-day old Rudbeckia hirta sprout with the seed casing still attached!

Finally, after many attempts at germinating Rudbeckia hirta seeds, I have succeeded!

I first saw them on Skyfiery’s blog and fell in love with the flowers. It was around the Christmas season last year, and I thought the opening bud looked especially Christmassy. Then when I saw the lovely bright colours of the fully-opened flower, I was a goner. Since we both enjoy growing our plants from seeds, Sky kindly passed me some harvested seeds, and I was off …to many false starts.

Believe me when I say I tried many ways of germinating these seeds – surface sowing on many different media, ziplock sowing when I got more desperate, more surface sowing, and finally – since my caixin had sprouted so readily this way – on damp tissue in an enclosed container. The seeds started germinating in 4 days.

Just to give you an idea of how tiny the sprout is - that's it on the bit of tissue paper, in the middle of a 7cm wide pot. Tiny!

I was eager to transplant the little sprouts as soon as possible, but they had already rooted themselves in the wet tissue! Thankfully, it was a simple matter of tearing off the area of tissue they were attached to and placing that atop the new home – a small pot filled with a Tref mix. The tissue will disintegrate in time, and root shock during transplant is minimized.

I chose to use Tref because I had looked up the correct soil pH for rudbeckias and found it to be between 5.5 to 7 – in my current limited understanding of this, the answer was the black/white mix of peat that is Tref.

So, for better or for worse, the first seedlings are now sitting atop their new homes, and taking no chances, I’ve covered them for now with transparent plastic cups to help keep the humidity in while they stabilize. In the meantime, a few more seeds look like they’re beginning to germinate, too. Let’s hope I can nurture them nicely to maturity!

© 2011 curiousgardener.com All rights reserved.


Share