Recycling plastic bottles in the garden

Let’s face it… we’re a society that creates a lot of crap that can’t be easily disposed of. Plastic has been a blessing in manufacturing but a curse to the environment. So, how do we “Greenies” cope? We do our best to use fewer plastic products (a tough one since plastic is used in so many things), and we try to find as many ways as possible to reuse the plastic items already in our possession until they absolutely, positively have to be sent to a landfill somewhere.

When it comes to used soft drink bottles, I cut them to use:

  1. the bottom third or so as a nursery pot,
  2. the top bit as a funnel, and
  3. the middle ring (if you’ve cut it neatly) as a bottomless pot in the garden for shallow-rooted plants that you want to restrain within a small area. (I haven’t needed to do this myself, but it’s a possibility!)

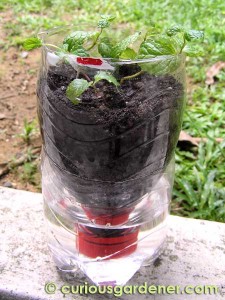
A recycled drink bottle converted into a self-watering container - perfect for plants like mint that need moist soil

Recently I was introduced to the idea of using the bottom and top pieces of the bottle as a unit to form a self-watering container. Just invert the top of the bottle, with the cover loosely screwed on, and fill it with potting mix. The cap keeps the mix from falling out. Half fill the bottom of the bottle with water, and place the inverted top half in it. Water will seep through the loosened cap and moisten the potting mix. What I love about this design is that there’s no way for mosquitoes to get to the water, and you can see your plant roots as they grow along the sides of their growing container!

Another way to utilize used bottles is to pierce a few small holes along the sides and bottom of the bottle, and bury the bottle so that only the top is above ground. Fill the bottle with water, cap it loosely so that mosquitoes won’t be able to breed in the water, and it will slowly release water underground, directly to your plant’s roots. This will keep your plants happy and hydrated, even on hot days!

22 April 2010 is Earth Day. What can you do to take care of our planet?

© 2010 curiousgardener.com All rights reserved.


Share

Ginger updates

"Ginger Avenue"

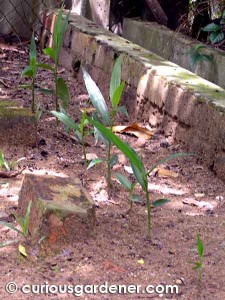
It’s been almost three months since I planted my first ginger crop. Part of my venture was to observe how ginger would fare in different growing conditions. I knew that it supposedly grows well in semi-shade, so I planted two such lots – one that gets partial sunlight, and the other with hardly any direct sunlight.

Both lots did very well, but the one in the most shade seemed to be the most eager to grow. Whenever I look at that thriving row of plants, the words “Ginger Avenue” come to mind…

The plants in partial sunlight both thrilled and concerned me. I was happy because the first-ever plant grew here; and I was concerned because only two of the four budding rhizomes I put in sprouted. I thought in retrospect that I’d cut the ginger too small, thus decreasing the chances of sprouting. Remember that I’d cut the rhizomes into as many bits as I could, with only one growing bud per piece. That was pretty ambitious and greedy of me, but I knew I had to have some room for failure, even though I privately wanted full success!

Sprouting turmeric

Well, that was before the weather changed. It was with great delight that I saw the last two plants sprout – and slight chagrin, because I’d assumed they were not going to grow, and had planted a bit of turmeric where they had been. So, when the new shoot showed, I thought it was the turmeric, but then it struck me that the sprouting leaves looked like normal ginger. This left me in a quandary because the only way I could be sure was if I dug it up. I was reluctant to try this because of my very first attempt at growing ginger so long ago, when I’d accidentally torn the plant from it’s roots when transplanting it from pot to ground. It left me with the impression that the roots are very fragile, and I didn’t want to take the risk.

I was perturbed for a few days until another shoot popped up, and it was different – this one was light green with a pink tinge to it, and it was straight like a spear. So, curiously, I dug up the first plant, keeping as much earth possible around it to not disturb the roots, and found it to be a normal ginger plant. I transferred it to the other end of that row of ginger where it’s now happily growing.

Growing ginger in full sun

As for my other lot of ginger that was planted in full sunlight, it doesn’t seem to be very pleased. Although all the plants have sprouted, they seem to be dragging along when compared to the ones growing in shade. Two of them even died out after sprouting – one due to the intense Feb-Mar heat, and the other thanks to being stepped on by my dog! However, they both did start growing again, but very, very reluctantly. I decided to shift them over to Ginger Avenue to see if they would like that better. The stronger of the two has shown a marked improvement, and I’m waiting to see how the straggler will fare.

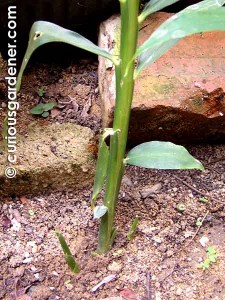
The oldest ginger plant with offshoots to either side of the stem. Click pic to zoom

Plant in a pot

I also started growing one plant in a pot, to see how it would compare to the rest that grew in the ground. Although it sprouted easily, the rate of growth is much slower than its’ free range counterparts.

The potted plant also serves as an example to my friends who live in apartments to show that they can grow ginger, too. You just have to use a large enough container. There will be updates on this plant as well, in due time.

Progress!

On a happy note, my oldest ginger plant – the one that first sprouted – is thriving happily. It now has two offshoots, and I am happily letting my imagination run riot about how the rhizomes are developing underground. The earliest you can start harvesting ginger is when it’s about 4 months old, but I think I’m going to wait for my babies to come to full maturity. That could mean that I have a HECK of a lot of ginger on my hands, but my momma thought ahead and has already bought a book of ginger recipes! So I have a few months more to consider: how do I cook thee, let me count the ways

And to decide how much to re-plant and start all over again… :)

© 2010 curiousgardener.com All rights reserved.


Share

Harvesting your snap beans

Alright, so here I am, the curious gardener, always looking to experiment with my plants. After a long (to me) wait, my snap beans finally went all the way and fruited. Yes, after more than a month of taunting me with pretty bunches of flowers, the courtship is finally over and we are in business!

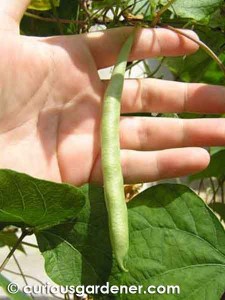
Remember this picture? Yup, meet the Firstborn.

So my next puzzle was deciding when to harvest the beans.

There are many, many sites that tell you that, but I am ever the Doubting Thomas – I have to see and do things myself to believe they should be done that way. I know, I know, it’s a character flaw… :P

So, do you remember Baby Bean? Well, BB wasn’t the firstborn. There was actually another bean that was so well-hidden under a bunch of hanging leaves, that was fully grown when I finally found it. So it reached adulthood while the others were just becoming teens. Because of this, I decided to keep it for seeds for the next generation, and wait for the others to grow up. I guess Firstborn is going to be my benchmark for the entire life cycle of a bean on the vine.

So, coming back to the question… how grown up is “grown up”? I knew that keeping the beans on mama plant would result in less tenderness as they grew up. But, I wanted to know how big they’d be able to grow. Some grew pretty straight while others were curved like a sickle. Would the shape affect the length, I wondered? Not really, it appears. Some were just longer or shorter than others, regardless of shape.

Again, back to the question… WHEN to harvest the beans from the plant?

The University of Illinois extension mentions:

Harvest when the pods are firm, crisp and fully elongated, but before the seed within the pod has developed significantly. … Be careful not to break the stems or branches, which are brittle on most bean varieties. The bean plant continues to form new flowers and produces more beans if pods are continually removed before the seeds mature.

Ohio State University advises harvesting “when tender and well-shaped, before the developing seeds cause the pods to bulge”.

My dad simply told me to pick them before the beans got bumpy.

So… we’ve had our first harvest. It was a modest one with just six beans ranging from 10 to 13cm long. But, it was just the first. There are more beans still developing on the vines and I really hope bean season will last for a while. If it doesn’t, then I’ll have to take note of how long it took to reach this point, and work out a timetable for successive planting in the future, like what I’m doing with my sweet potatoes and sweet corn. It’s kind of challenging planning that, but I’m up for it. Here’s to the future. Cheers!

Our first humble harvest of snap beans

© 2010 curiousgardener.com All rights reserved.


Share

Getting the veggie family started

It’s odd that it’s only been four weeks since we finally left the dry monsoon season in it’s own dust and started getting rain more regularly. Somehow, it seems much longer than a month. The dry, withering lawn is green once more – although it’ll be another month or so before I consider it “lush” – and the only areas of brown are patches of earth where the grass hasn’t grown back yet. Or where the dogs have… well, never mind. :P

The break in the weather brought out my desire to start playing with the packets of seeds that I’d been holding on to. Why did I choose to wait? Because of how my snap beans were behaving – flowering and aborting for over a month. I figured the weather wasn’t right yet. But, once that changed, so did my plans.

As you know, my whim right now is for vegetables, and I’d accumulated a nice variety of seeds – Marigold and Torenia flowers and lots of veggies – long purple and round green brinjals (eggplant), chilli, pepper paprika, loofah, cucumber, tomato, hairy basil, okra, long beans and sweet corn. It was time to start my little veggie “family”.
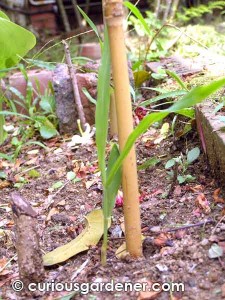
3-week old sweet corn plant. Doesn't it look like long grass?

I was most excited about the sweet corn, so that was planted first. I wanted to stagger the harvest, so I decided to plant three to four plants every other week or so. The seeds sprouted well and the older lot is over 20cm high now. I had to mark the spot of each plant with a short stick to remind everyone, including myself, not to touch them, because they really, really look like grass, and I have an uncontrollable urge to weed them out! I can’t wait for them to grow even bigger so that I can stop thinking that…

And marking where you’ve planted seeds is so very crucial. I had planted three loofah seeds along the fence, thinking they’d take about a week to sprout. On day four, someone went around with a weed-whacker and beheaded one of the little sprouts that were already 5cm high! I had no idea that those little fellas would grow so vigorously! Anyway, I’ve decided to stick with two plants for now because I’m not sure if I’ll really enjoy eating the fruit. At the very least, I suppose I’ll end up with some natural scrubbies… :D The plants are about 15cm high now and busily extending tendrils for support. I’ve been directing them towards the chain-link fence and then they should be on their way.
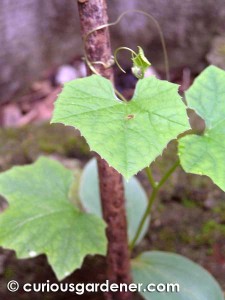
Loofah vine at 2 weeks

One little problem, though – the seed leaves of one of the loofah plants developed some weird, squiggly marks that a GCS Forumer said were the work of leaf miners. I’ve removed the offensive leaves and have my fingers crossed that the plant won’t be affected by the miners. Talk about your alien invasion… :(

The long beans germinated with no problems. Beans seem inclined to vigorous growth. I set up a trellis for them using 6-foot bamboo sticks in the A-frame setup, and the most advanced plant has already wound it’s way to the top of it’s pole. One seedling was a bit sickly, so I had to get rid of it and plant a new seed in it’s place. I didn’t enjoy that at all. Culling is not my thing; I’m more inclined to let all my plants just grow and be happy. :(

Blissful okra after an afternoon rain shower.

The okra plants – or ladies fingers, as we call ‘em here – grew with no problems. All five seeds that I sowed in a pot grew cheerfully, and once established, I transplanted them to a prepared plot where they’re thriving right now. Less than 8 weeks to harvest! (fingers crossed)

The pepper paprika put up one, maybe two sprouting seedlings. I say maybe because I’m not sure of the second seedling will survive. They seem to be quite fragile and can die out after a day or so, which has happened twice already. They’re slow growing, compared to the okra and loofah, but I’ve definitely got my eye on them…

I’ve had 50-50 success with the cucumbers. Only half the seeds sprouted where I’d sowed them at the base of another prepared trellis. After waiting more than a week since the first seeds sprouted, I decided to re-sow seeds at the vacant trellis legs. I’d really like to have one plant growing up each trellis support, and by George, I will have that! There are still several seeds left in the packet, so I’ll keep trying until I run out of them…
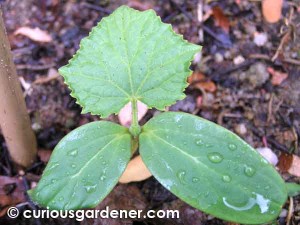
Cucumber sprout. Aren't the seed leaves shaped uncannily like a cucumber?

Now the rest of the seeds that I planted in pots are playing hide-and-seek with me. Interestingly, they seem to be the plants with smaller seeds – namely the brinjals, chilli, tomato and basil for the veggies, and the marigold and Torenia flowers. Man, those seeds for the Torenia were microscopic! It might as well have been powder in the packet! Anyway it’s been more than 3 weeks and I’ve gone through two rounds of sowing seeds. Nothing’s showed up except for one tomato, one marigold and a couple of chilli seedlings that died off after a couple of days. I’ll lay a bet that the seeds are just waiting for me to stop peering down into the pots several times a day before they all decide to simultaneously sprout! Isn’t that what happens when you watch a pot of water on the stove? It only starts to boil when you turn away… Hopefully those naughty seeds will miss me and burst into activity. Nothing makes my day more than seeing my plants thriving!

© 2010 curiousgardener.com All rights reserved.

Share