Caterpillar season again

One of several hatches of caterpillars that have been appearing too often for my liking...

One of several hatches of caterpillars that have been appearing too often for my liking…

It’s that time again, that horrible time, when I keep finding freshly hatched caterpillar hordes on my plants. And not just those caterpillars where one egg is laid here, and another there. No, those horrible hairy caterpillars whose eggs are laid in a clump, and that hatch en masse, and flay whole leaves as the horde spreads out over the entire plant…

I hate them.

If I’m lucky enough to discover them just after they hatch, and before they migrate to other leaves, I usually pluck the offensive leaf off, place it on a flat surface with the caterpillars on the bottom side, and stomp on the leaf (not barefoot, of course!) to kill the caterpillars.

If I’m unlucky, I’ll have to search many leaves and have to execute the caterpillars individually.

Let’s just say I’ve had mixed luck… Grrr. Hope you’re not affected by them too.

© 2015 curiousgardener.com All rights reserved.


Share

Rescuing the papaya tree – again!

Here's the papaya tree in early October, when the top began to start leaning over to the left...

Here’s the papaya tree in early October, when the top began to start leaning over to the left…

Remember the “miraculous” papaya plant I started from a stem cutting? And remember how I “let” it get root bound and still managed to rescue it? Well, the poor plant has not overcome all possible obstacles yet. The unfortunate result of it getting root bound was that the main stem had begun to get thinner and thinner. I managed to get around that by planting it as deep as I could, now knowing that it will grow new roots along the stem when covered by soil.

Well, as the plant began to bud and develop more fruits, it began to get top-heavy and started leaning to one side. What concerned us most was that the lower part of the stem began to look too thin to support the growing weight, and began to bow little by little. The topmost part of the stem has been thickening properly as it should, and will definitely have no problems holding up the many fruits that the plant will bear. Our concern was whether the bottom would snap under the weight of all the fruits.

I was all to happy to find a forked support for the plant rather than have to construct a tripod around it.

I was all to happy to find a forked support for the plant rather than have to construct a tripod around it.

I thought I could get around this by mounding more earth around the stem, which we now know will cause the plant to start growing new roots. My thought was not to pile up all the earth immediately – and my ultimate aim was to build up by another 2-3 feet, covering all of the too-thin stem – because I wanted to first make sure the stem would not rot away or anything drastic like that. However, the haze happened, and my dogs for some reason started digging a massive trench nearby, and I only mounded up the soil once while coping with the other things. Then the fruits suddenly started developing much faster, and the stem began to bend even more…

I think the best way to describe this is that the tree is absolutely LADEN with fruits! No wonder it began to lean over so much.

I think the best way to describe this is that the tree is absolutely LADEN with fruits! No wonder it began to lean over so much.

In a bit of a panic, I managed to find a sturdy branch of the Peacock tree that I had pruned off a while ago, that was forked – I’ve been collecting branches that I prune to use as plant supports. Fortunately, this one was perfect for lodging the fork just below the lowest fruits and jamming the other end into the ground to hold the stem straight and steady. (I was not enjoying the thought of having to create a tripod to do this…) As we harvest fruits, I can raise the fork until it reaches the part of the stem that has thickened properly, and in the meantime I can continue mounding up the soil. I hope that this will be the last of this poor plant’s trials. I know I certainly could have done much better by it. However, this is going to take a little time to do. At least we managed to worm our way around the issue once more.

© 2015 curiousgardener.com All rights reserved.


Share

A-climbing we shall go!

The long bean plants steadily winding their way up their respective strings.

The long bean plants steadily winding their way up their respective strings.

As a follow-up to my last post on the new trellis bed, I did indeed string up the long bean plants to the trellis. One end of the string is attached to the top of the A-frame trellis, while the other end is looped around the stem of the plants – one string per plant.

A loose loop around the stem of the long bean plant is positioned just below a leaf node for a little traction.

A loose loop around the stem of the long bean plant is positioned just below a leaf node for a little traction.

It was a little tricky to tie the string around the stem of the plants, because it can’t be tied tight as the stem will continue to grow and thicken (although not too much), and we don’t want to strangle the plant. However, you do need to have something for the string to pull against, so I placed the loops just below the leaf stems. The leaves will fall in time, but by then the stem will have wound its way up the string and that won’t be an issue any more.

Have you ever noticed that long beans wind in an anti-clockwise direction?

Have you ever noticed that long beans wind in an anti-clockwise direction?

What I may try next time is to attach the lower end of the string to a peg in the ground so that I don’t have to worry about damaging the plant stem. It should be a better way of getting the string taut. Right now, one of the strings is a little loose because I didn’t make a small enough loop around the plant, so it’s been dangling around and tempting the neighbouring plant to latch on – which it did. Live and learn.

© 2015 curiousgardener.com All rights reserved.


Share

The new trellis bed

I’ve been getting worried that the plants I started from seed at the beginning of this month were starting to get pot-bound. As a matter of fact, as a quick remedy, I put the pumpkin and watermelon plants in bigger individual pots during the week, until I have the time to plant them out.

Well, and when the hazy weather isn’t so bad.

The planted bed below the A-frame trellis. I didn't make it too wide because I thought I was going to plant just a few bean plants (and they don't live that long anyway), but the side poles are tall at about 2 metres high.

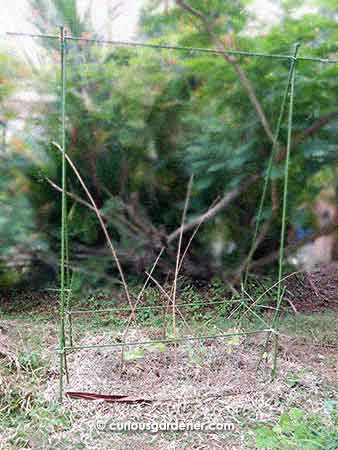
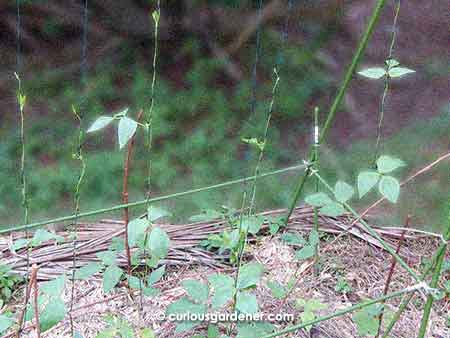
The planted bed below the A-frame trellis. I didn’t make it too wide because I thought I was going to plant just a few bean plants (and they don’t live that long anyway), but the side poles are tall at about 2 metres high.

It was a little bad yesterday, and I wasn’t up to being out in it then after being caught in it on Friday evening when it edged into the 200+ PSI zone. So, when it looked a bit clearer today, with passing showers included, I decided I had to make the most of the opportunity and get planting.

The plants of most concern to me were the long bean and okra plants. The latter, especially were looking quite poorly, and I was anxious to get them planted out.

As you well know, long beans need to climb, so I decided to set up a quick A-frame trellis. I had the A-ends ready a couple of weeks ago, and it was a matter of choosing where to set it up (decided on next to the dog-made swale). I also had a trellis net that I’d bought from Daiso (the gardeners’ toy store!), so I figured it would be a quick thing to set up.

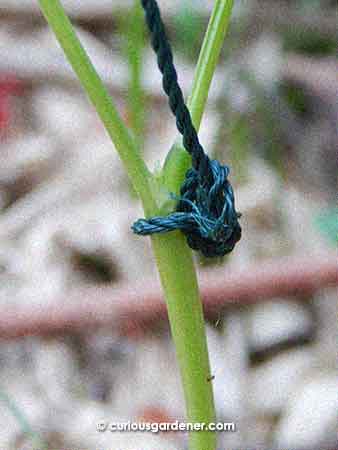
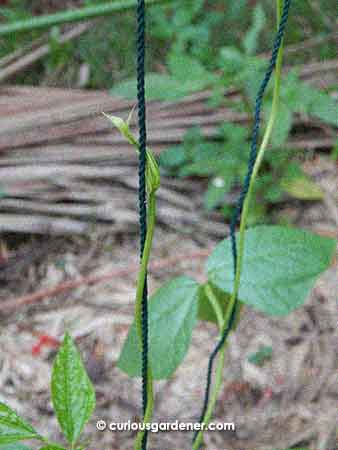
As I was doing this, I suddenly realised that the spot I had chosen was where a lot of birds like to fly, and that the netting could pose a danger to them. So, I ditched the net and decided to go with another option, which is to tie one end of a string to the top bar of the trellis, and loosely tie the other end to the bean plant to hold it up, and train the growing tip around the string. Unfortunately, I was out of string today, so I poked in a few stick supports for the plants to grab onto first. With my luck, I won’t have time to do this until next weekend, so this is probably for the best. I’m pretty good at winging things where DIY is concerned – I once kept adding to a trellis setup as the plant was growing, and it worked just fine, so this should, too!

With the frame ready, I next had to get the plants – and it occurred to me that I don’t have to grow just beans there. There was a nice rectangular area at the base of the trellis, and I decided to plant the row of bean plants along the front edge, and a couple of okra plants on the outer edges of what I was now viewing as a planting bed, and completed by interspersing a couple of flowering plants that I had lying around.

The plants with a thick layer of bamboo leaf mulch (keep the mulch away from the stems of the plants!) with bits of dried palm tree flower bracts around the plants. The bracts should also keep the bamboo leaves from flying around too much.

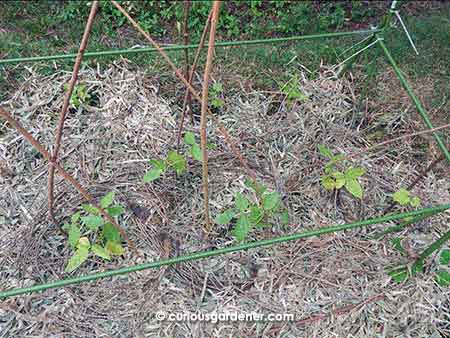
The plants with a thick layer of bamboo leaf mulch (remember to keep the mulch away from the stems of the plants!) with bits of dried palm tree flower bracts around the plants. The bracts should also keep the bamboo leaves from flying around too much.

After finishing the planting, I watered each plant well, then added a layer of mulch consisting of dried bamboo leaves that I got when my neighbour pruned his plants, then I topped that with dried flower bracts from our palm trees.

Why use the flower bracts, you may ask? Well, I’ve noticed that when they fall from the palm trees and land on the grass beneath, the grass always grows eagerly over them and benefits because the bracts are quite woody and absorb and retain moisture after it rains. It may be our local equivalent of using wood chip mulch, I guess. Also going with the wood chip mulch method, the reason I kept the bracts on the top is because they’re woody, and wood absorbs nitrogen when buried; this in turn robs the soil of nitrogen, which affects the plants. I’ll discuss this more in future posts. Anyway, this is my first experiment with them, and we’ll see how it works out.

Anyway, I’m glad I got some of the plants in their permanent homes this weekend. There’s more to do, though… there always is!

© 2015 curiousgardener.com All rights reserved.


Share